Saturday, July 2, 2016

Dump Valve Redux

Continuing the saga of replacing the original Thetford dump valve on my 1961 Safari, I needed to obtain an adapter that would enable me to go from the 3.5" bolt spacing and 2" hole opening to a 3.75" bolt spacing with a 3" hole opening.

You can actually find an adapter plate for this purpose on Vintage Trailer Supply but I had three major concerns with their offering.

First, their adapter requires you to orient the new dump valve handle on an angle and my trailer requires the dump valve handle to go straight rearward, though the bumper.  For any other angle I'd need to cut new holes through the frame and I'd rather not do that.  Plus I want to use the old Thetford handle and linkage.

Second, the VTS adapter is made out of aluminum and I'm concerned it might not hold up to "black water juice".

Third, the Valterra valve has two gaskets, one on each side of the gate valve, and the gasket needs something to support it.  The VTS adapter is flat, and doesn't have anything to support the gasket.

When you look at the valve without the gaskets, you can see the gaps on each side.  Without a good gasket seal, the black water tank could leak past.


The "collector" downstream of the new valve has a lip, or wall, that extends into the gasket - pressing it into the valve for a good seal.  My new adapter needs to have something like that as part of the design.


The rubber gasket has a 3-demensional profile so it can't just be smushed up against a flat plate.


With the gasket in place, you can see how the Valterra parts are engineered for a good seal.


I'll need to custom-make a new adapter and that's going to require precise machining.

So what's better than having your own machine shop???   Having a friend with his own machine shop.

I drew up a sketch and brought my new and old parts to my friend and he custom-made an adapter to fit my needs.

We chose Delrin for the material.  Delrin is a black, high strength, machinable plastic.  It will hold up well to the black water tank contents and also provide a strong adapter for the new valve assembly.  Another option is a free-machining stainless steel - and I could make a good argument for that too.

As you can see, on the downstream side of the adapter, there's a wall integrated into the plate, just like on the collector-side of the valve.  This will give the valve a good seal on the black water-side.

In order to get the bolt patterns to line up properly, I had to offset the 2" and 3" holes, so they're not centered.  That shouldn't be an issue though - the contents of the tank drop straight down by gravity.


The tank-side of the adapter has an 1/8" o-ring, engineered to compress 20% when the plate is secured to the brass black water tank flange.  The other four holes in the adapter are for the valve assembly.  They have threaded inserts installed so the valve bolts can get a good grip.

If you look closely you can see a little of the 2" hole is outside the edge of the 3" hole.  That's because there wasn't enough space to accommodate the threaded inserts in the plate.  If I went with stainless steel I would have been able to move the hole pattern a little and have the 2" hole inside the 3" hole... oh well.  This should work fine.


My collector only has one inlet from the gray water side.  So I need to do something with the 1.25" line coming from the shower.  Before I start anything else, I will prime and paint the frame while I have access to it.


The first thing to get installed is the adapter plate.  I'm using 1/4-20 stainless cap screws with blue locktite.  I don't want vibration to loosen these screws and I don't have the space for lock washers.  I might have to someday take this plate off though - so blue locktite is a good choice.  A little silicone around the o-ring will ensure a good seal.


The adapter is in place.  Now to try the new valve and collector assembly.


That looks pretty good.  The outlet of the collector will extend about 1.5" below the belly pan.  That's perfect.  I took the handle off the valve so that I can jury-rig something to extend it out the back bumper.
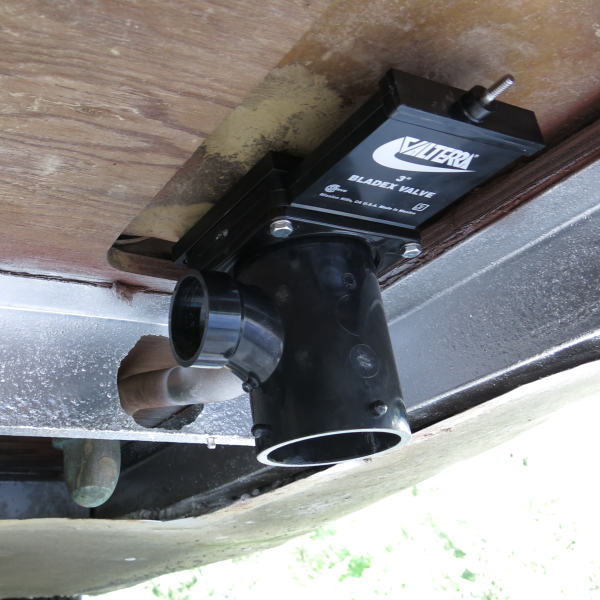

My old Thetford valve had a clevis-style joint.  I debated trimming the clevis portion off and drilling / tapping a hole in the end of the rod so I could screw it onto the valve rod.  After some thought, I used a short piece of angle iron to reuse the clevis joint and it also provides a little needed offset.  This was a perfect solution.


Here it is installed... everything pulls and pushes smoothly.  A little more blue locktite is used to keep it from working loose.


I had to work a little black magic with black ABS plastic fittings in order to get the shower drain to go into the gray water drain.  I couldn't find a fitting to go from metal to black ABS so since they are both 1.25" lines I just sealed the connection with "goop".  It should work fine.


The old sheet metal cover over this area was galvanized steel.  It was rusted and raggedy in numerous places so I bought a new aluminum sheet to cover the opening.   It was a little tricky to get my hole in the right place but I got close enough for government work.  Wide-flanged rivets secure it all in place.


A Rhino-flex 90 degree elbow will allow me to connect my sewer line in a campground or dump station.


This renovation was a LOT of work but I have to say that I'm very pleased with how it turned out.  From the outside you would have no idea that the dump valve has been replaced.  It all works just as it did in 1961 - but now it's serviceable.

SaveSaveSaveSaveSaveSaveSaveSaveSaveSaveSaveSave

Saturday, June 11, 2016

Back in the Saddle...

Well, Cecil survived the Winter unscathed, thank goodness.  I stopped by the storage yard a few times  over the months to check on him and each time everything looked safe and sound.

One time I saw some condensation inside after a huge snow storm.  So I bought a bucket-o-dessicant that is used as a dehumidifer and it kept everything nice and dry inside after that.

Anyway,  Cecil is back in my driveway to continue some of the renovations on my to-do list.  The list is getting very short though.  The main thing left is to replace the old Thetford dump valve so I can use the black water tank again.

Airstream used a brass Thetford valve from 1959 through 1964 that is no longer serviceable and the modern hoses and fitting don't accommodate the old fittings.  The only option is replacement and in order to do that, I have to get the current one out.

Now that I have a new axle, the trailer rides about 4" higher than it did when I first got it.  I also lowered the tongue a few inches and that gave me even more clearance at the rear.

Someone long ago had cut a hole in the belly pan and covered it with galvanized steel sheet metal.  That will have to go but my first step will be to take it down.


I'm glad I opened this up... the drain line from the sinks has been patched and it has cracked.  There was a TON of very fine silt inside the belly pan.  That confirms my theory that at one point this trailer was submerged in a flood of some sort.  I don't see any obvious water damage - just about 100lbs of unnecessary dirt on top of the belly pan.

At least now I can see the dump valve and what it will take to remove it.  There are four slotted bolts that hold it to the brass fitting imbedded in the fiberglass tank, on the right side of the photo below.


Looking upward, the shower drain comes from the forward side - the right side of this photo.  The two sinks drain into the street-side.  They don't have dump valves.  I could install a small gray water tank on the street side of the trailer, I suppose.  But I already have a "blue boy" portable gray water tank to use if needed.


Here's a shot of the street-side and the silt inside the belly pan.  Yuck.


I had to use a lot of penetrating oil and my impact driver to get the four 1/4-20 bolts holding the valve out.  I got three to come out clean but the fourth broke off.  So I had to drill it out and re-tap it.


Here's a tank-side view of the valve.  The gate no longer moves and this valve has been stuck open - which is fine.  I'd rather have that than a full tank of "stuff" to deal with.  The tank is bone-dry thankfully.


Here's a shot of the tank without a valve installed.  Now I have to figure out how to put a modern dump valve in place, how to make it accessible for use, and how to reconnect the shower and sink drains.


Here's the view looking up into the tank.  If it wasn't so dark you'd be able to see the business end of the toilet.  It's position directly above the drain hole.


I'll show you the finished project when I figure out what to do next.

Saturday, October 17, 2015

For Every Time There is a Season

It's October in Eastern PA and that means the first frost is quickly approaching.  When I replaced the old copper plumbing in the Airstream a lot of it had obvious signs of damage from frozen pipes.

Most things expand when heated and contract when cold and although that's true with water too, water is funny in that when it initially freezes it expands almost 10%.  If it gets super cold it will contract again but it has to expand first - and that can cause serious damage if it's contained by something that won't expand with it.

I replaced all of my copper tubing with PEX and PEX will expand more than water will require.  However, I have plenty of brass fittings, valves and other elements in the system that will not expand.   So it's best to "winterize" an RV or boat to make sure you don't have to repair things in the Spring.

The first step with winterizing is to drain all the tanks.  There are two tanks in my Safari, the fresh water tank and the black water tank.  The latter is currently always empty because I can't close my dump valve... it's old, stuck open and non-repairable.  I'll have to replace it next year if I want to use the black water tank as a tank.   Airstreams didn't have grey water tanks until the early 1970's.  So there's no grey water tank to drain - but I do want to get the water out of the plumbing traps.

The fresh water tank can be drained by running the freshwater pump until its fully exhausted.  The tank could still have some water in it but as long as it's not full, the ice can expand into the empty void.  I do want to get the water out of the tube though.

Another tank to drain it the hot water heater.  It has it's own drain plug to remove once the system is drained.  It's best to include a set of by pass valves int he plumbing system so that you can empty the hot water heater and then by pass it so you don't waste 6 gallons of anti-freeze trying to fill it up.

Once the trailer is drained of water, the next thing to do is to blow compressed air through the lines to push out any water that may be stuck inside.  The easiest way to do that is to connect a blow out plug to the city water connection on the side of the trailer.

I bought a Camco blow out that screws on the standard garden hose fitting on one end and has a quick connect fitting for the compressor hose.  Since the city water connection is designed for city water pressure of ~55 PSI, I'll set the compressor to 40 PSI so I don't over pressurize the plumbing lines.

The fitting just screws right onto the city water port and then I open each valve inside the trailer to allow the compressed air to blow out any remaining water.  Its surprising how much water can still be inside lines that have been "drained".


Every line gets emptied, one at a time, until nothing but air comes out, including the toilet.  Then the next challenge is to get RV antifreeze into the system.  RV antifreeze is specially formulated for potable water systems and is not the same as antifreeze you might use in your car, etc.  A lot of folks may skip this step but I think it's inexpensive insurance to protect against the remote chance there's still water somewhere inside.

There are three ways to get RV antifreeze into the trailer... you can dump a couple gallons into the fresh water tank and use the pump, you can install a FW tank bypass and use the freshwater pump, or you can use a hand pump and push it through the city water connection.  

I decided on the latter approach - it seemed the most effective with the least fuss.  All I needed was a Camco hand pump.  You pump it in while a helper opens each valve until red antifreeze drains out. 

Every place where water is intended to come out is operated until RV antifreeze comes out, including the toilet.  Then you know there's zero chance of water freezing in the system.

The last step is to pour any remaining antifreeze into the sinks and shower, so all the traps and drains are clear of water too.  I also left the refrigerator door open so the interior gets fresh air.

There's also water in the 12V battery - so I'll remove that from the trailer and put it in my garage so I can keep it from freezing and keep it charged too.


A couple of large trash bags will cover the LPG tanks, hose and regulator and protect them from the effects of snow and the sun.


The two tires plus the spare are covered by vinyl tire covers to protect them from UV rays and unnecessary exposure to the elements.


And finally, all the windows are closed and the curtains drawn to protect the interior from UV exposure.  I also sealed every exterior seam with fresh Trempro sealant - so hopefully no water will leak in from snow and rain.


Cecil is all buttoned up and can settle down for a long Winter's nap.  Sweet dreams, I'll wake you in the Spring!

Sunday, September 6, 2015

The Maiden Voyage

My wife and I had a family goal to try to use the trailer for the first time by Labor Day.

We bought the trailer in mid-April but it took a long time to get everything on the punch list checked off.  Looking back, it was a pretty extensive list - a baker's dozen, and this is just the major things.

1.  Polish the outside skin
2.  Replace the axle, inspect frame, and reattach belly pan
3.  Install a new LPG hot water heater
4.  Install a 30 Amp shore power connection
5.  Replace the hot and cold water lines with PEX
6.  Install a new fresh water pump with strainer.
7.  Replace both sink faucets, repair bath shower and sink sprayer, confirm toilet is operational
8.  Repair the LPG lines, install new regulator
9.  Confirm the refrigerator works, repair if necessary (or possible)
10.  Come up with a solution to connect a sewer hose to the old style Thetford dump valve.
11.  Install a converter to charge the 12V system while on shore power
12.  Install a city water connection
13.  Build and install a new screen for the front window

By the first of September all of the items had been checked off.   Someday I may do a total gut-job and replace the floor, rewire everything, etc. but for right now the rig is completely roadworthy with most of the comforts of home.

So it was time to go somewhere - but where?

I've gone camping plenty of times with my son in the Boy Scouts but I've never gone camping with my family in a non-scout related genre.  It turns out there are quite a few Airstream-only campgrounds scattered across the US and the closest one was in New Jersey, not too far from the beaches near Avalon and Cape May.  We hadn't made it to the beach this year so this was the perfect destination... at least my wife and I thought so, the kids weren't completely sold on the idea.

Fortunately, they haven't reached the age of majority so they don't get to vote.  We packed up two-nights worth of "stuff" and hit the road.

My tow vehicle is a 2012 Tacoma 4x4 with the tow package.  It will easily tow the 3,000 lbs Safari but I need to be careful not to over load the truck and eat into the payload rating too.  The trailer is light enough that I don't need a weight distributing hitch.  I did install an anti-sway bar, just to be on the safe side.

Cecil is all hooked up and ready to hit the road.


The speed limit on the Commodore Barry Bridge is just my style... turtle speed.


The Jersey Shore Airstream Haven is located about 15 minutes from the beach, or the "shore" as they say in these parts.  It's a nice campground with 98 wooded sites, a clean pool, nice pavilion and other utilities.  Of the 98 sites, all but 7 have full timers occupying them.  So there are 7 sites available for visitors, plus the rally field for overflow.

The people are very friendly and we felt right at home.


There are about a dozen Airstreams in storage in the campground.  It reminded me of an elephant graveyard as many of them were, shall we say, in varying degrees of disrepair.


I was pleasantly surprised to find that our 1961 Safari was one of the nicest looking vintage campers in the campground.  There were a couple of almost-new looking RVs too but most Airstreams on site looked well-lived in.

We set up our site with the camper on one side and my son's tent on the other.  Our awning spanned the difference and made a cozy spot to sit and enjoy the breeze.  Based on the grins, this wasn't going to be too bad.


I haven't been to "the shore" in 25 years.  We tend to frequent the beaches further South.  We went into Avalon, just a 15 minutes drive, for dinner and to see the sights.  One of the things I'm not keen on about New Jersey beaches is you often have to pay for a "beach badge" to access the water.  However, after 5:00 no badge is required so we got to enjoy the ocean for a little while, free of charge.


My daughters enjoyed reenacting the bow scene from "The Titanic" using the life guard's skiff as a prop.


Avalon is a nice little town and is lit up with Christmas lights in the evening.  My son is smiling widely - that's because this is before the family trounced him in putt-putt golf.


The best part of waking up in a campsite is to make coffee the old fashioned way, in a percolating pot.


On day two we went to Cape May - a beautiful little touristy town on the Southern-tip of New Jersey.  From there you need to cross the Delaware river to go further South.  Among the sites we visited was a winery and then a micro-brewery where my wife and I enjoyed several samples of interesting brews and my kids enjoyed root beer and ginger ale made on site.


After our second night, all that was left to do was to pack up.  But first, I had to make a run to Kohler's Bakery in Avalon for some sticky buns and creme-filled donuts.  That was okay though, as it gave me time to fill up the truck with gas.

Coming back on Sunday on Labor Day weekend meant we enjoyed very little traffic on the way home.  My wife's photo of Cecil through her windshield looks almost like a watercolor.  It was a beautiful day for a leisurely drive back home.


Our first trip in the camper was a complete success.  All systems worked, we had no major issues or goof ups and best of all, I think the kids even enjoyed themselves a little.

We'll definitely be doing this again.

Thursday, September 3, 2015

Let There Be Light

One of the more challenging projects I've had to date on this Safari has been lighting the rear.

Originally it would have had three similar fixtures in the back, two over the bunks and one over the bathroom sink.  The fixtures would have had one 12V bulb and one 110V bulb.  Unfortunately they have been lost to time.

The PO had installed little LED pucks over the bunks and the rear bath was completely unlit.  The LED pucks had a red LED that was constantly on - I guess like a night light but the pucks would eventually drain the trailer battery because there was no way to turn them off without disconnecting them.  So they had to go.


It seems all but impossible to locate new light fixtures that are dual voltage.  The 110 is nice for when you're connected to shore power and the 12V is great for boon docking.

I happened upon a set of three fixtures from a Airstream Globetrotter from the later 1960's.  I thought they might work great but the fixture was a bit too big for the bathroom location.  I was able to use them over the bunks though.

For the bathroom, I found a nice LED under cabinet light that was perfectly sized for the small space in the bath.  It won't run on 12V but that's life I guess.  I can put a little lantern back there for boon docking.

I was able to get 10 watt LED lights in both 12V and 120V for the other fixtures and they're in a warmer color range too - so they give off very similar light. 

When both voltages are turned on, the rear of the trailer is very pleasantly lit.  In fact, once the beds are made up with sheets, blankets and pillows, I think it will be very comfortable bath there at night.


The front of the trailer has two dual voltage sconces on the walls over the dinette and a dual voltage ceiling fixture.  With all fixtures lit up it's actually very pleasantly illuminated inside.  Way more comfortable than the Boy Scout tents I'm used to camping in.


We're now ready for our maiden voyage and shakedown cruise.  It's been a three month journey to get to this point but as of now... All systems are go!

Wednesday, September 2, 2015

What Goes In...

One of the things that makes an Airstream more than a glorified aluminum tent on wheels, is the ability to onboard water, pump it around to various places and, ultimately, drain it back to the outside when you're through with it.

Getting it out is fairly easy, as the sinks and shower simply drain to the rear and pour out the opening below the "dump valve".  The dump valve holds back the contents of the "black water tank" - or the collection from the commode.  Up until the mid-1970's, Airstream didn't include a "gray water tank" - so the sinks and shower didn't have to be collected and stored before being dumped.

That's not the case today though.  If you don't have a gray water tank you're expected to use a separate portable gray water tank, sometimes called a "blue boy".

Bringing water onto the trailer is a different story.  Normally there are two potential sources... a fresh water tank that you fill or a "city water" connection that allows you to connect a pressurized hose at a campsite.

My trailer only had a fresh water connection - and at some point someone put a garden spigot on there - I guess thinking it made it easier to connect a hose for filling.


The other side of this spigot simply drains into a large polyethylene tank located under the street side bunk.   The present system is not pressurized.  Back in the day, as they say, the tank would have been metal and a small air compressor would have blown air into the tank, thus creating pressure to force the water out the pipes and feeding the various fixtures.

At some point in the last 55 years the original tank was removed and the poly tank was installed, along with a 12V fresh water pump.  There's a flimsy plastic hose between the 1/2" fitting on the tank and the pump inlet.  It's technically not under pressure but it's hardly something that I would trust to hold back 20 gallons of water.


Moving aft, you can see the new hot water heater that Frank installed while the trailer was at his spa in Baltimore getting a lift and tuck.  The new hot water heater is in stark contrast to the mish-mash of tangled copper tubing that surrounds it.  The line wrapping around to the side is the propane line.  The others are all water lines... cold on the bottom and hot on the top.


There is no city water connection on this trailer.  The plumbing is fed solely by the freshwater tank and the 12V pump that pressurizes it.  Just a little further aft of the hot water heater, the lines bend toward the side of the trailer and then route along the wall to the rear bathroom.


There is a LOT going on in a very small space under the bathroom sink.  There are the hot and cold lines for the sink, hot and cold for the shower (on the left below), cold for the kitchen sink-style sprayer - call it a "bidet" to sound more sophisticated - but it's purpose is to clean the commode after you do your business.  The sprayer hose has dry rotted and is no longer connected.  The shower hose had also dry rotted and needed to be replaced.  Oh, and one more cold line going to the toilet for the actual "flushing".  I had to re-pack or replace all of the valves in this area.


Both P-traps in the two sinks had rusted through and needed to be replaced.  Otherwise the drain systems appear to be fully functional.  The dump valve is stuck in the open position at the moment.  I can't close it but I'd rather have it stuck open than closed.  I'll save that for another day.  The dump valves made prior to 1964 are no longer serviceable and need to be completely replaced.

The copper lines were a mess, to be put it kindly.  It was interesting to see the effect of freezing in the lines.  The 3/8 lines had expanded to in some places to larger than 3/8" but still smaller than 1/2".  There was a series of copper-to-rubber-to-copper patches here and there, where apparently leaks had been repaired in the past.

It all had to go but that was easier said than done.  I'm going to assume that the plumbing was installed before the cabinetry so getting my hands back far enough to cut out the myriad copper lines required being one part mechanic and one part contortionist.   But I got it all cleared out eventually.

I used PEX tubing for the new fresh water system, blue for cold and red for hot.  I replaced the freshwater pump with a new Shurflo Evolution 3 gpm unit and installed a strainer prior to it to catch any debris that might accidentally get into the tank (not that it could get past the spigot).


From the pump the water is pressurized and goes into a manifold, of sorts.  The line on the right goes to the kitchen sink, the next line goes to the hot water heater, then to the rear bath, then to a drain and the final line on the left is a newly installed city water connection.  The line with the valve is the drain line... if I open that the system can be pumped dry.


All the lines in the back under the sink are plumbed with PEX now.


I had to cut a hole in the side of the trailer to install a new city water connection.  I don't know if that's taboo but I figured I'd rather have an easy to access water connection than a hard to access one, or none at all.

From the inside, the water connection goes to a braided flex hose and then into a PEX line back to the manifold.  There's a check valve in the water connection to keep the water from being pushed out by the fresh water pump and there's a valve in the pump to keep the city water from being pushed into the fresh water tank.  So the manifold can be fed by either source.


On the outside of the trailer, the new city water connection looks like it's been there since the day this trailer left Ohio.  Okay, it doesn't look 55 years old but it does look like it belongs there, at least to my eye.


A new bathroom faucet adds a nice finishing touch.


And not to be outdone, the kitchen sink got a new faucet too - and it swivels to feed either sink, just like the original faucet.


It was very gratifying to finally put some water in the tank and start the new fresh water pump.  It was exciting to hear the water forcing it's way out though the lines, filling the hot water heater and, ultimately, coming out the faucets.  The hot water heater fired up on the first try (thanks again Frank!).  The fresh water pump will pump up to a certain pressure and then shut off.  If it senses a drop in pressure (from a valve being opened) it will come back on.  Plus it has a feature where it bleeds a little water back to the inlet side so the pump doesn't have to cycle on and off when there's low flow. So no accumulator is needed in this system.

When I first turned on the pump, it wouldn't shut off.  After a little research online I diagnosed that a slight tweak to the pump was needed and, after a minor adjustment, everything is now running fine.

The system also works flawlessly on a city water connection and the new valve incorporates a pressure regulator so I don't have to worry about supplying too much pressure to my new PEX system.

Only one major system is left to address.  There are no lights in the back two-thirds of the trailer.   That's not a problem during the day but it gets a bit gloomy back there when it's dark.

Fixing that will come next.