You can actually find an adapter plate for this purpose on Vintage Trailer Supply but I had three major concerns with their offering.
First, their adapter requires you to orient the new dump valve handle on an angle and my trailer requires the dump valve handle to go straight rearward, though the bumper. For any other angle I'd need to cut new holes through the frame and I'd rather not do that. Plus I want to use the old Thetford handle and linkage.
Second, the VTS adapter is made out of aluminum and I'm concerned it might not hold up to "black water juice".
Third, the Valterra valve has two gaskets, one on each side of the gate valve, and the gasket needs something to support it. The VTS adapter is flat, and doesn't have anything to support the gasket.
When you look at the valve without the gaskets, you can see the gaps on each side. Without a good gasket seal, the black water tank could leak past.

The "collector" downstream of the new valve has a lip, or wall, that extends into the gasket - pressing it into the valve for a good seal. My new adapter needs to have something like that as part of the design.

The rubber gasket has a 3-demensional profile so it can't just be smushed up against a flat plate.

With the gasket in place, you can see how the Valterra parts are engineered for a good seal.

I'll need to custom-make a new adapter and that's going to require precise machining.
So what's better than having your own machine shop??? Having a friend with his own machine shop.
I drew up a sketch and brought my new and old parts to my friend and he custom-made an adapter to fit my needs.
We chose Delrin for the material. Delrin is a black, high strength, machinable plastic. It will hold up well to the black water tank contents and also provide a strong adapter for the new valve assembly. Another option is a free-machining stainless steel - and I could make a good argument for that too.
As you can see, on the downstream side of the adapter, there's a wall integrated into the plate, just like on the collector-side of the valve. This will give the valve a good seal on the black water-side.
In order to get the bolt patterns to line up properly, I had to offset the 2" and 3" holes, so they're not centered. That shouldn't be an issue though - the contents of the tank drop straight down by gravity.

The tank-side of the adapter has an 1/8" o-ring, engineered to compress 20% when the plate is secured to the brass black water tank flange. The other four holes in the adapter are for the valve assembly. They have threaded inserts installed so the valve bolts can get a good grip.
If you look closely you can see a little of the 2" hole is outside the edge of the 3" hole. That's because there wasn't enough space to accommodate the threaded inserts in the plate. If I went with stainless steel I would have been able to move the hole pattern a little and have the 2" hole inside the 3" hole... oh well. This should work fine.

My collector only has one inlet from the gray water side. So I need to do something with the 1.25" line coming from the shower. Before I start anything else, I will prime and paint the frame while I have access to it.

The first thing to get installed is the adapter plate. I'm using 1/4-20 stainless cap screws with blue locktite. I don't want vibration to loosen these screws and I don't have the space for lock washers. I might have to someday take this plate off though - so blue locktite is a good choice. A little silicone around the o-ring will ensure a good seal.

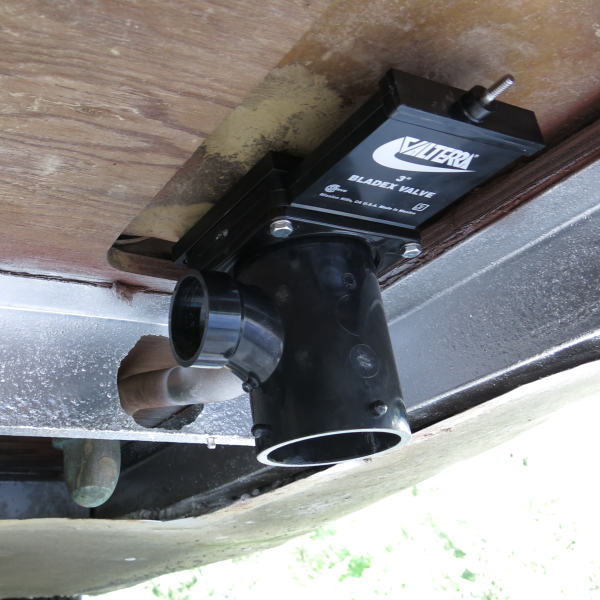
The adapter is in place. Now to try the new valve and collector assembly.

That looks pretty good. The outlet of the collector will extend about 1.5" below the belly pan. That's perfect. I took the handle off the valve so that I can jury-rig something to extend it out the back bumper.
My old Thetford valve had a clevis-style joint. I debated trimming the clevis portion off and drilling / tapping a hole in the end of the rod so I could screw it onto the valve rod. After some thought, I used a short piece of angle iron to reuse the clevis joint and it also provides a little needed offset. This was a perfect solution.

Here it is installed... everything pulls and pushes smoothly. A little more blue locktite is used to keep it from working loose.

I had to work a little black magic with black ABS plastic fittings in order to get the shower drain to go into the gray water drain. I couldn't find a fitting to go from metal to black ABS so since they are both 1.25" lines I just sealed the connection with "goop". It should work fine.

The old sheet metal cover over this area was galvanized steel. It was rusted and raggedy in numerous places so I bought a new aluminum sheet to cover the opening. It was a little tricky to get my hole in the right place but I got close enough for government work. Wide-flanged rivets secure it all in place.

A Rhino-flex 90 degree elbow will allow me to connect my sewer line in a campground or dump station.

This renovation was a LOT of work but I have to say that I'm very pleased with how it turned out. From the outside you would have no idea that the dump valve has been replaced. It all works just as it did in 1961 - but now it's serviceable.
No comments:
Post a Comment